How to use the Copy Monitor Tool with Linked file
Revit's Copy/Monitor feature is very common feature that is used in every project, but I find that even experienced Revit users are not too familiar with this feature. In this blog we will look at a process for copy-monitor by taking an example of Grid.
Why do we need Copy/Monitor in our projects?
· To reduce the size of the files for easy handling
· To divide the model by disciplines for better collaboration
· To protect intellectual property and share only the information that is required
Overview of the Copy/Monitor workflow for grids:
On the Collaborate tab you will find the Coordinate panel where the copy monitor tools reside
The Current Project tool allows you to copy and monitor objects within your project. You would use this when multiple people are working within the one project.
The Select Link tool allows you to select objects from a linked file and either copy the objects into your project and monitor them or monitor existing project objects compared to objects in the linked file.
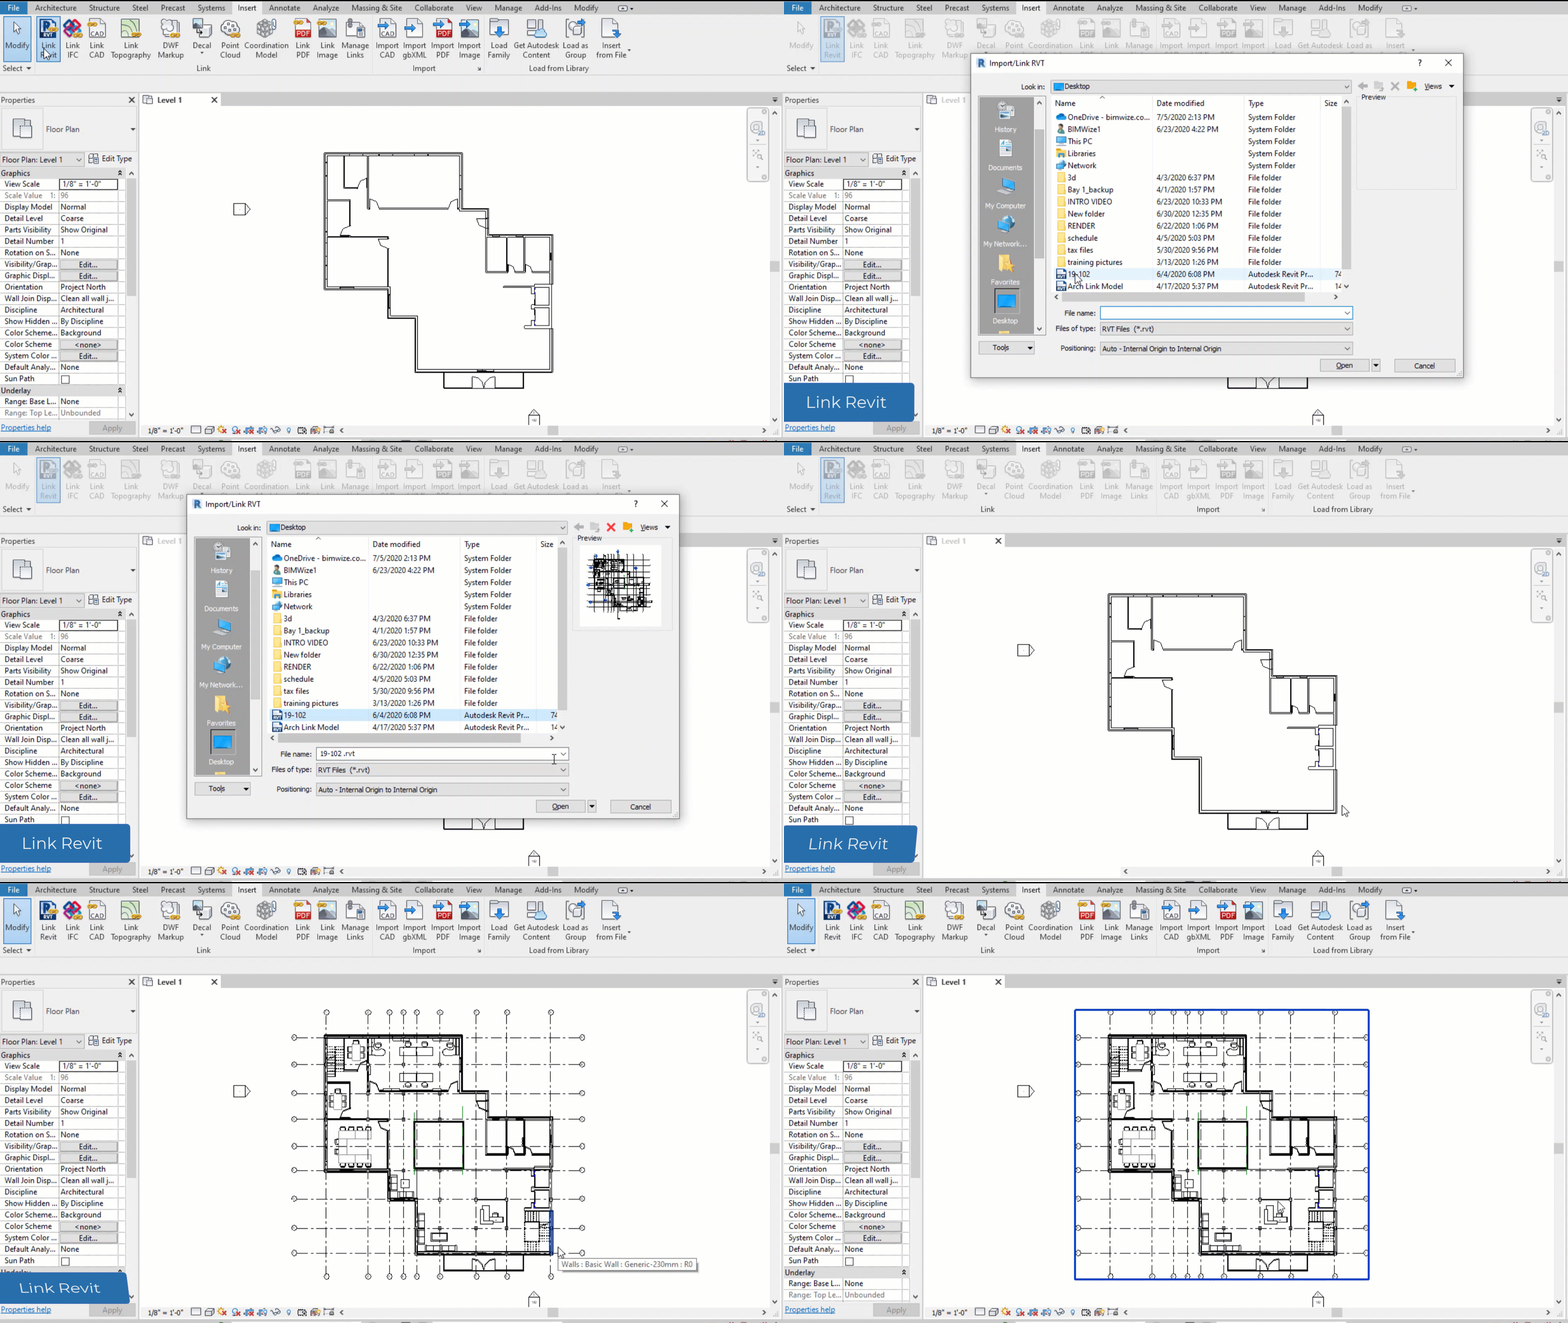
3. Next step is to add Revit link, so click on select link to choose file and its position.
Once the file is loaded we have to make sure that it is correctly located and properly aligned with our host model. For this, it can be useful to take as reference a combination of two grids and a level.
Manage links:
Unload and reload a link if we know that it has changed in the middle of our session.
Reload the link from another location.
Change the reference between overlay and attachment type.
When you link a file with the same links that you already have, a window will appear to warn you
Delete a link. After the removal of any link Ctrl-Z will not be able.
Copy/Monitor:
Copy/Monitor workflow for grids:
Once the Copy/Monitor mode is started, we click the Copy command (see gif below) and start clicking on grids (which are coming from the linked model) in the model or select all then filter it by selecting only Grid option.
Click Finish when done selecting all the grids.
Monitor elements:
Check the Copy/monitor settings.
Select the copy command. Select the link.
You can Use the Copy/Monitor tool to monitor changes to the following types of elements: Levels, grids, columns (but not slanted columns), walls, floors, openings and MEP fixtures.
You should see a new element appearing in the host model with a symbol that reveals that it is a monitored item.
To monitor any element the procedure is the same
Coordination Review:
To monitor changes that have been made to linked files or models by the project team while doing project coordination, we require coordination review. When changes are made to an object from a linked file Revit then displays a dialog box which indicates that an instance of a linked file requires coordination review.
Coordination review process in Revit:
·When Revit users perform coordination review they should first approach ‘Coordinate panel’ that is situated in ‘Collaboration ribbon,’ and from there users are required to select ‘coordination review.
Once coordination review is selected by Revit users they are further required to select ‘Select link’ option in Revit after which they should click on to linked model.
As soon as link is selected by Revit users the software automatically displays ‘Coordination Review dialog. Within this dialog box a list is displayed which shows all the modifications and changes that require some kinds of action.
With the assistance of messages in this dialog box Revit users can identify the elements of a linked file which were changed, deleted, or moved.
The action taken by the BIM Manager or Revit users eventually makes changes in the current project in Revit. That means any action that is chosen by Revit users do not make any changes in the linked file but instead changes are made to current project.
For example, if ‘Postpone/Do Nothing’ action is selected by Revit users it means do nothing to the element. Its selection helps in changing the massage status so that it can be tackled later on.
If ‘Reject’ action is selected by Revit users, it means or suggests that no modifications and changes should be made to host model. This eventually means that changes made to the linked files by Revit users are incorrect and it is important that changes are made to the associated monitored element.
This information must be shared with the project team so that the issue can be tackled.
In this way coordination review process can be successfully carried out by Revit users. There is a lot more to talk about related to Revit... so, stay tuned.


